Junos ZTP with Dnsmasq DHCP in OPNsense

Most people know that DHCP (Dynamic Host Configuration Protocol) is a protocol used to dynamically allocate IP addresses. But did you know that it can be used to configure other host device settings? Network device vendors like Junip... ermm, HPE Networking... take advantage of DHCP to implement "Zero Touch Provisioning" and even perform software upgrades for out-of-the-box devices. Here I will show you how to use OPNsense with Dnsmasq DHCP to "auto-provision" your Junos devices.
Requirements
- At least one zeroized Junos device.
- A Junos base configuration file saved on an (S)FTP server.
- An (S)FTP server in your network reachable by the Junos device(s).
- An OPNsense device with Dnsmasq DHCP enabled[1].
- An understanding of OPNsense firewall rules[2].
- A hex converter. Link to the one I used here.[3].
Junos Base Configuration
Below is a very simple base config to allow SSH, but I highly recommend you set up your own. Try configuring a Junos device once with some basic configuration, then use that to create your own template. Remember, this will apply to all out-of-the-box devices that pull a DHCP address.
system {
    root-authentication {
        encrypted-password "$6$9rdHQ5nJ$ilwzYPYghLkr9mXFVLrXRKnOaj.jhIDwYLT31w0//bunn1JSPUxVNEkGuoBoRinJrMiOKJKLCWsuLmyBcejzD0"; ## SECRET-DATA
    }
    services {
        ssh {
            protocol-version v2;
        }
    }
}
interfaces {
    fxp0 {
        unit 0 {
            family inet {
                dhcp;
            }
        }
    }
}
The root password here is set to Tut0ria1!. Feel free to customize your base config as needed! Add non-root users, ssh keys, a management routing instance, name-servers, default routes, the list goes on!
Configuring DHCP Option 43 Suboptions
This is the tricky part that really makes or breaks the setup. Before we start, we have to decide on a few things:
- The config filename.
- The file transfer method. (FTP, SFTP, etc.)
- The character length of #1 and #2.
- Any other suboptions you're configuring.
For this example we are using the filename init.conf and the FTP protocol. The filename is 9 characters long and the protocol is 3. Easy enough right?
Playing with hex
To encode all of this info for DHCP option 43, we will need a hex converter to put it all together. The order for combining them is as follows: suboption + length + value. This can be repeated for all suboptions you're configuring.
Suboption 1
Junos uses this suboption to set the config filename. For this example, we will use suboption 1 + 9 + init.conf. Converting these to hex individually (with colon separators) becomes 01 + 09 + 69:6E:69:74:2E:63:6F:6E:66
Suboption 3
This suboption is used by Junos devices to specify the file transfer protocol. The same process applies here: convert and combine. Suboption 3 + 3 + FTP becomes 03 + 03 + 66:74:70
Putting it all together
Once you've performed your conversions, combine them all like so: 01:09:69:6E:69:74:2E:63:6F:6E:66:03:03:66:74:70. You should be good to move on to the next step. Unless...
Go the extra mile
If you have physical Junos devices you can also perform a software upgrade using ZTP. Suboptions 0 or 4 can be used to specify a software image for upgrades. Use the same steps as above to convert the suboptions and combine them. More Junos ZTP info here[4].
OPNsense Settings
Dnsmasq DHCP
This guide assumes you have OPNsense in your network already handing out old boring DHCP leases using Dnsmasq on a predetermined VLAN. If you're already there thankfully OPNsense makes it easy to just add some DHCP options.
DHCP options tab
- Navigate to the DHCP Options tab in OPNsense. In the 'Options' section click the plus to add a your first DHCP option.
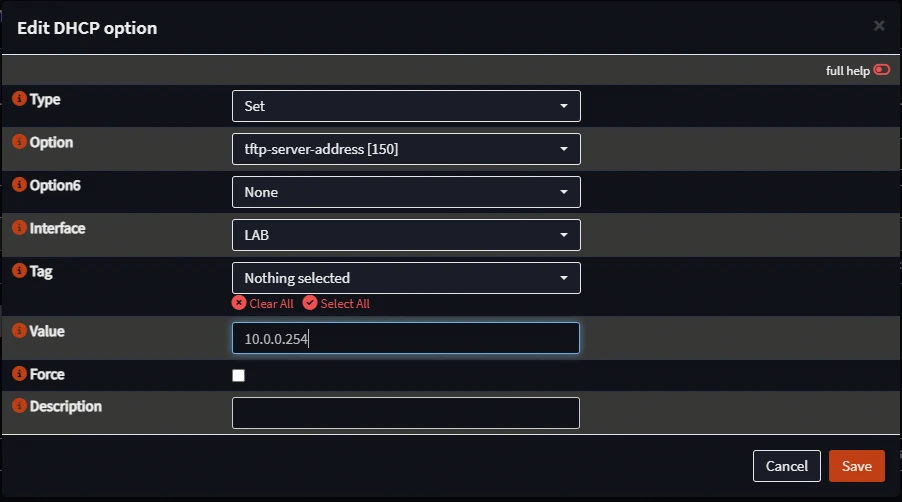
- Configure Option 150 like shown. Be sure to select the interface that your network devices are using and the IP of your FTP server.
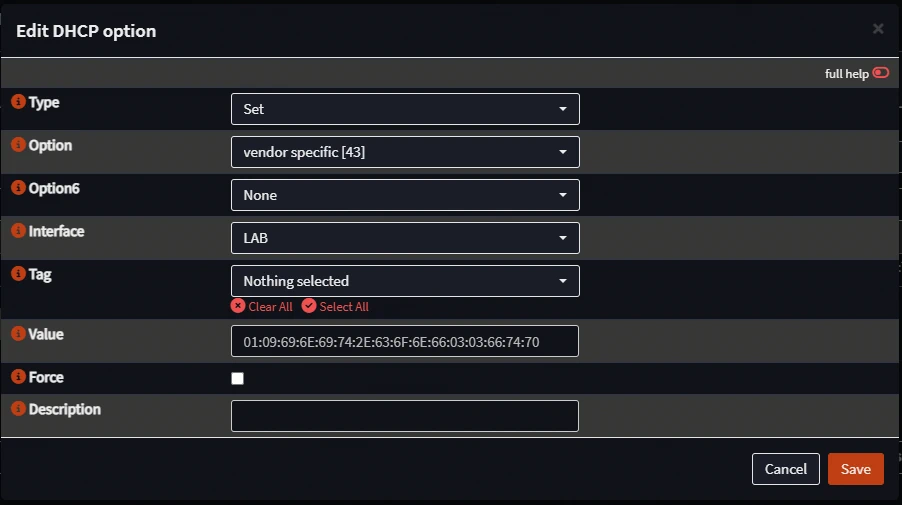
- Click add again and now we add Option 43 like so. Use the hex value you calculated earlier here.
Firewall rules
OPNsense will open up the port needed for DHCP but you will need to create your own firewall rule for the file transfer protocol you're using.
In this case I am using my NAS to host the FTP server so my config looks like so:
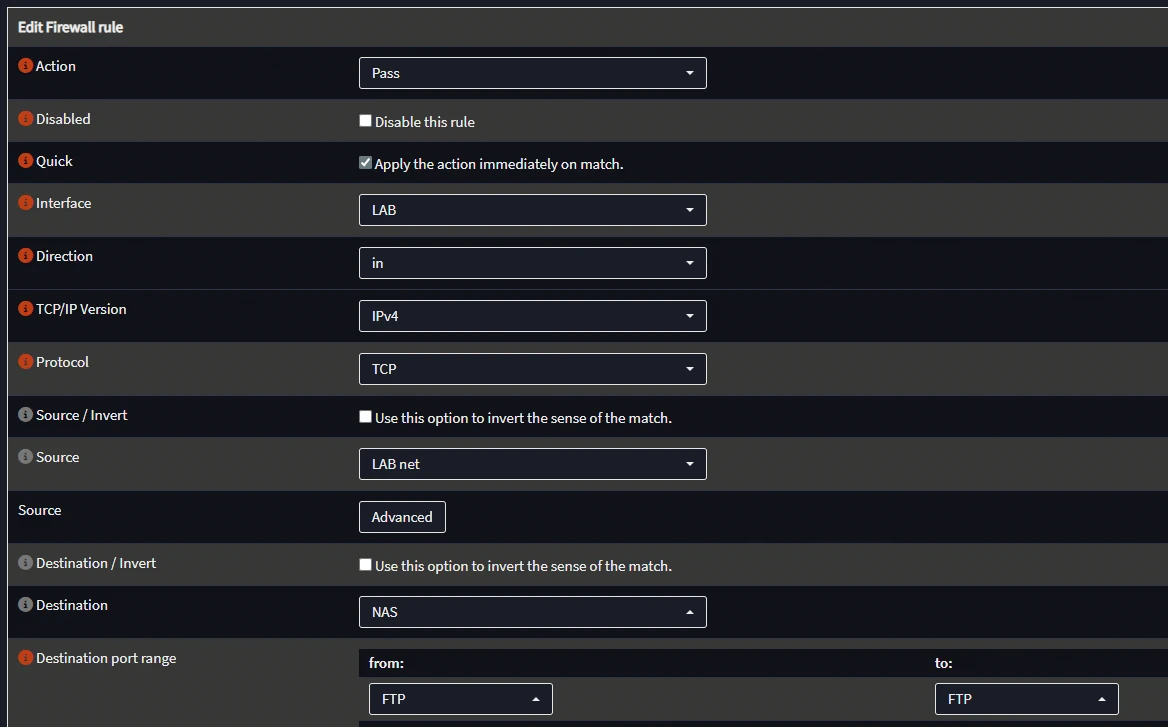
Be sure to apply the changes as needed!
Finally, Zero Touch Provisioning!
Now that you have your configuration file, ftp server, and firewall rules in place you can finally provision your devices!
Connect your Junos devices to management and boot them up! Once up, assuming all goes well, then you should get something like this:
root>
Auto Image Upgrade: DHCP INET Options for client interface fxp0.0 ConfigFile:
init.conf Gateway: 10.0.0.1 DHCP Server: 10.0.0.1 File Server: 10.0.0.254
 Options state:
Partial Options::Config File set,Image File not set,File Server set
Auto Image Upgrade: Active on INET client interface : fxp0.0
Auto Image Upgrade: Interface::   "fxp0"
Auto Image Upgrade: Server::      "10.0.0.254"
Auto Image Upgrade: Image File::  "NOT SPECIFIED"
Auto Image Upgrade: Config File:: "init.conf"
Auto Image Upgrade: Gateway::     "10.0.0.1"
Auto Image Upgrade: Protocol::    "ftp"
Auto Image Upgrade: FTP timeout set to 7200 seconds
Auto Image Upgrade: Start fetching init.conf file from server 10.0.0.254 through fxp0 using ftp
Auto Image Upgrade: File init.conf fetched from server 10.0.0.254 through fxp0
Auto Image Upgrade: Applying init.conf file configuration fetched from server 10.0.0.254 through fxp0
Broadcast Message from root@VM689D3B3F6F
        (no tty) at 19:29 EDT...
Auto image Upgrade: Stopped
Auto Image Upgrade: Committed Configuration init.conf received from 10.0.0.254 through fxp0

root@VM689D3B3F6F>
For those with a keen eye you may notice that the base config does not have host-name configured. But with the magic of DHCP the device was able to configure its own unique hostname! Now you can use that hostname or the DHCP IP to SSH to the devices using root and Tut0ria1! as the password thanks to our config file!
If at this point you are not seeing successful ZTP logs check your Dnsmasq configuration and be sure the OPNsense firewall rule is working properly. If you have any questions or need help, feel free to reach out!
Conclusion
This setup really helped me create many virtual labs while pursuing my certifications. I hope this tutorial can be helpful to someone starting their own lab. I know I could have used this a long time ago for sure!
This is only the beginning of our automation journey though! In the future I may do a tutorial on how to further automate device-specific settings using other automation tools and inventory files. Stay tuned!